The "Manage Leads and Opportunities" system upgrades the contact management features of the platform giving you more tools for managing your sales process. This guide will show you how to manage the leads and opportunities generated by Build Your List, Meet with Me, Webinar content, and other leads and contacts you may add to your account. The leads you collect through various assets or import on your own can be found under the “My Leads” tab.
Lead Lists
You track Leads through Lead Lists that consist of one or more contacts you import and create or that you have gathered through lead generating content. A Lead can be assigned to more than one Lead List. For each Lead List, a lead can have a Lead Level, a Lead Status, and a collection of Sales Activities.
Each streaming content channel will automatically generate an associated Lead List (with a similar name) when leads are recorded through lead generating content (e.g., Build Your List, Meet with Me, and Webinar content, etc).
View and Manage Leads
To view and manage your leads and opportunities:
Navigate to “Manage Leads and Opportunities” under the “Contacts and Leads” drop-down menu in the top menu bar.

You will then see a section labeled “My Leads.”

Here is where you will find leads and contacts that you have imported, or collected through lead generating content.
Viewing Your Leads and Contacts
From your “My Leads List” dropdown menu, you will be able to view Lead Lists you have created, along with Lead Lists created through Build Your List forms or other gated content. Navigating to “[Not in any Network]” will show you leads that have not been added to a Lead List.

Click on a specific Lead List to view the leads and contacts in that list. In some cases, the same lead may be in multiple Lead Lists.
Once you choose a list, you will see many options for managing that specific Lead List. You will also find options for managing the activity and information associated with specific leads.

Managing a List
When working with Lead Lists, you will have the option to:
- Add Leads
- Create New List
- Import Leads
- Export Leads
- Edit your List
- Delete your List
- Filter your List

Adding Leads
To add leads to your list, click the “Add Lead” button. This opens the “Create Lead” page where you will be able to create and add a new lead to your Lead List. You can add details such as First Name, Last Name, Email, Title, and Company, or edit any Custom Fields you may have created.

Creating a New Lead List
Click on the “Create New List” button to create a new Lead List. A box will appear that will allow you to name and describe your new Lead List.

Importing Leads
Click “Import Leads” to import new leads via a .CSV file, copy and paste using the clipboard, or by using an external source (e.g., CRM integration). Read the article How to Import Leads and Contacts to learn how to import new contacts to your Lead List.
Exporting Leads
Click on “Export Leads” to download a .CSV file of your collected leads in a specific Lead List.
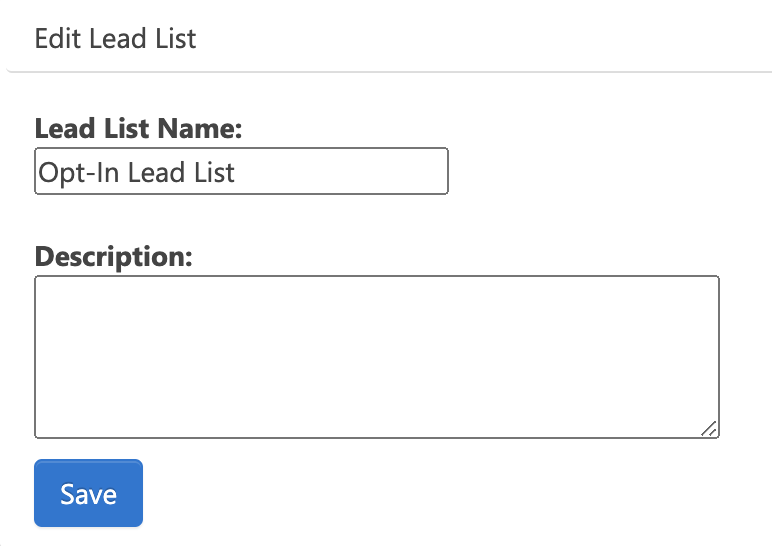
Editing a List
Clicking “Edit Leads” will allow you to edit the name and description of your Lead List.
Deleting a List
Click on “Delete List” if you would like to delete your Lead List. *Note that if you delete the list, the leads do not get deleted from your account. The leads that were in the deleted list, will now show under “[Not in any Network]” list.

Filtering and Sorting a List
Click on “Filter List” to find specific contacts in your Lead List.
You can filter by First Name, Last Name, Company, Email, and select a sort order (e.g. alphabetical, newest to oldest, etc.). You can also filter by Activity Type, Lead Level, and Lead Status.

Clicking on “Show additional filters” will allow you to filter by Opt-in Status, Deliverable Status, and Permission level.

Managing Your Leads
In your Lead List you will find all your leads belonging to that specific list. You will be able to:
- View Lead Information
- View Last Activity and Status
- Edit Contact Information
- Remove the contact from the List
- View links they have clicked on
- Delete the contact record from the platform
- Click “More Info” to view more about your Lead and record Lead Status and detailed sales Activity

You can view contact information, for each lead in your Lead List. You will also see the date and time the lead was captured, the Lead Level and Status, and any activity updates.
Edit Contact Information
Use the Edit icon to edit the contact information of each lead.

You will be able to edit all fields including First Name, Last Name, Email, Title, Company, Opt-In status, and more.

Remove Contact
Press the “remove” button as seen below to remove a contact from a specific list. Note that this does not delete the contact from the platform. You will still be able to find the contact in other lists, or “[Not in any List]” if they have not been added to any other list.

To remove the contact, click “Remove”.

View Contact Links
Click on the “Link” button to view links (on email campaigns) that a contact has clicked.

You can view, filter, or export your contacts activity history.

Delete the Contact Record
Click on the “x” to delete a contact record from the platform.

Click “Delete” to permanently delete the contact record from the platform.

The Lead Details Pop-up via the “More Info…” Button
When clicking the “More Info” button, you will access the Lead Details pop-up where you have the ability to edit Lead Status, view and add Sales Activity, and edit Contact Information. If the Lead is in multiple lists, you will have the ability to edit the Lead Status and Lead Activity pertaining to each list by changing the selected list.

Click on “Change” in the right upper-hand corner to choose the Lead List you would like to use when viewing or setting the activity.
Next, click “Edit Status” to edit “Lead Level”, and “Lead Status”.


From the drop-down lists, select the “Lead Level” and “Lead Status” to assign to the lead. The Lead Level indicates generally how you would characterize this Lead within the sales process. You can choose the level based on your own interpretation of the interactions you have had with this person. A “New - Pending Qualification” is often the starting point, and as you move down the list from there, the levels get progressively closer to the point where the Lead becomes a “Customer”.

The Lead Status is less about progress through the sales funnel, and more about the current assessment of the Lead

Once you have chosen the Lead Level and Status, this information will update in the Lead Activity area.
Viewing and Recording Sales Activity
The Sales Activity associated with a Lead is displayed in the Lead Details pop-up. The system will automatically record activity that comes from marketing efforts like publishing Build Your List content or sending email campaigns. You should also use this area to record sales activities related to this person. In this way, you can keep track of the ways you have been working with the Lead and record changes in Lead Level and Lead Status. For example, if you speak with a Lead on the phone, meet them at a trade show, or send a follow-up email, all of this activity can be recorded for future reference. It is also informative when you share sales efforts with other members of your team.

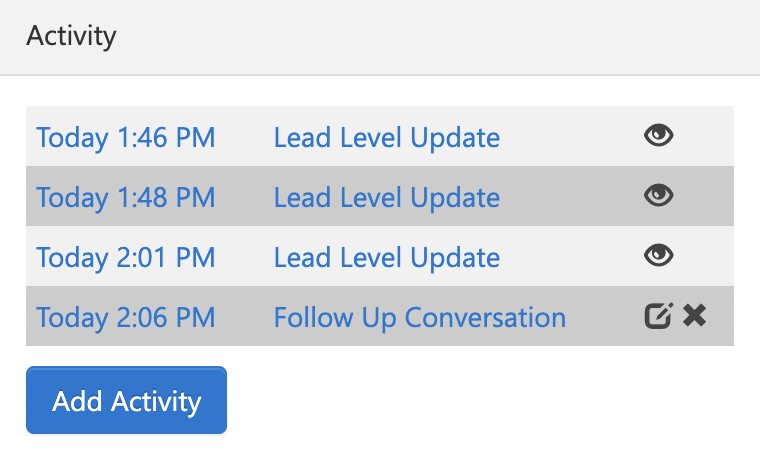
Click on the “eye” icon to view each Lead Activity.

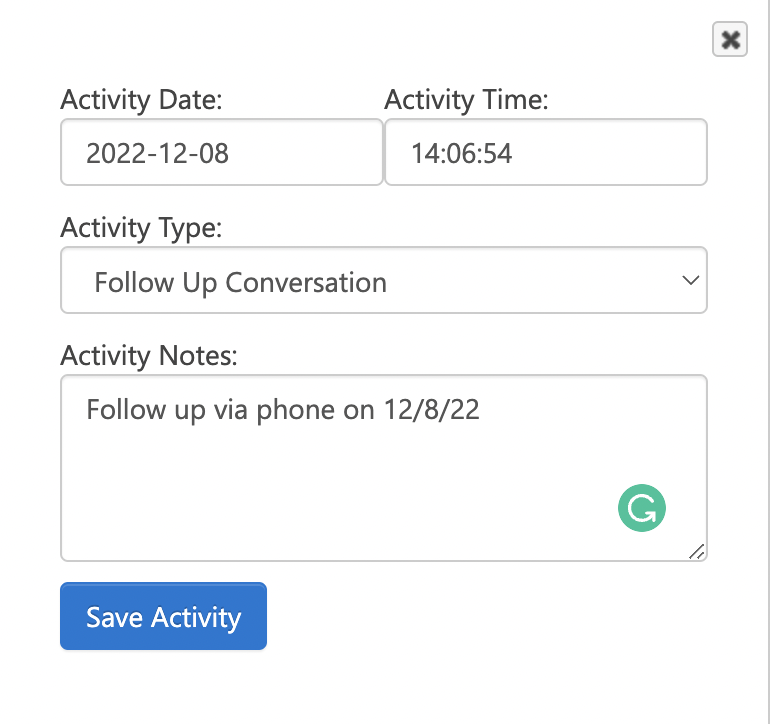
Click on “Add Activity” to keep track of interactions or other activities associated with this Lead.

Choose an “Activity Type” from the drop-down menu to record a new Lead Activity.

Choose to add Activity Notes pertaining to the activity type. See example below. Click “Save Activity” to save the information.
Under “Activity”, you will now see your recorded Lead Activity and note. Click on the “Edit” button to edit the note. Click on the “x” to delete the recorded Lead Activity.
Edit Contact Information
From the Lead Details pop-up you will have the ability to edit the lead contact information.

Edit details such as First Name, Last Name, Email, Company, Title, Opt-In status, and more.

If you have any further questions, please feel free to Submit a Ticket.